Post Processing - Why, What, and How....
Post processing sounds like an ominous phrase to beginners, but don't let it scare you. It simply means cleaning up or enhancing your photo. Like most things in life, it may encompass a whole host of additional meanings, but let's just stop there for now!
WHY? Today's digital cameras have many options and settings. In years gone by, memory was extremely expensive. I remember being ecstatic when I was able to buy 1 megabyte of memory for only $100. But I digress. Photos can be saved in different formats (RAW, JPEG, BMP). JPEG is the most commonly used format . It utilizes complex math to shrink the size of the file. This allows photography to be something we could afford, allowing us to take more than 10-12 pictures on a memory card. Of course, there is always a trade-off. We lose quality when we compress these photos. Additionally, the sensors in our cameras rely on light to "excite" each pixel. In low light conditions, they strain very hard to gather every possible photon. This creates what we call digital noise, and can be compared to the graininess we used to see when shooting very fast film. Neither one of these conditions are acceptable if we wish to present our best shots for viewing.
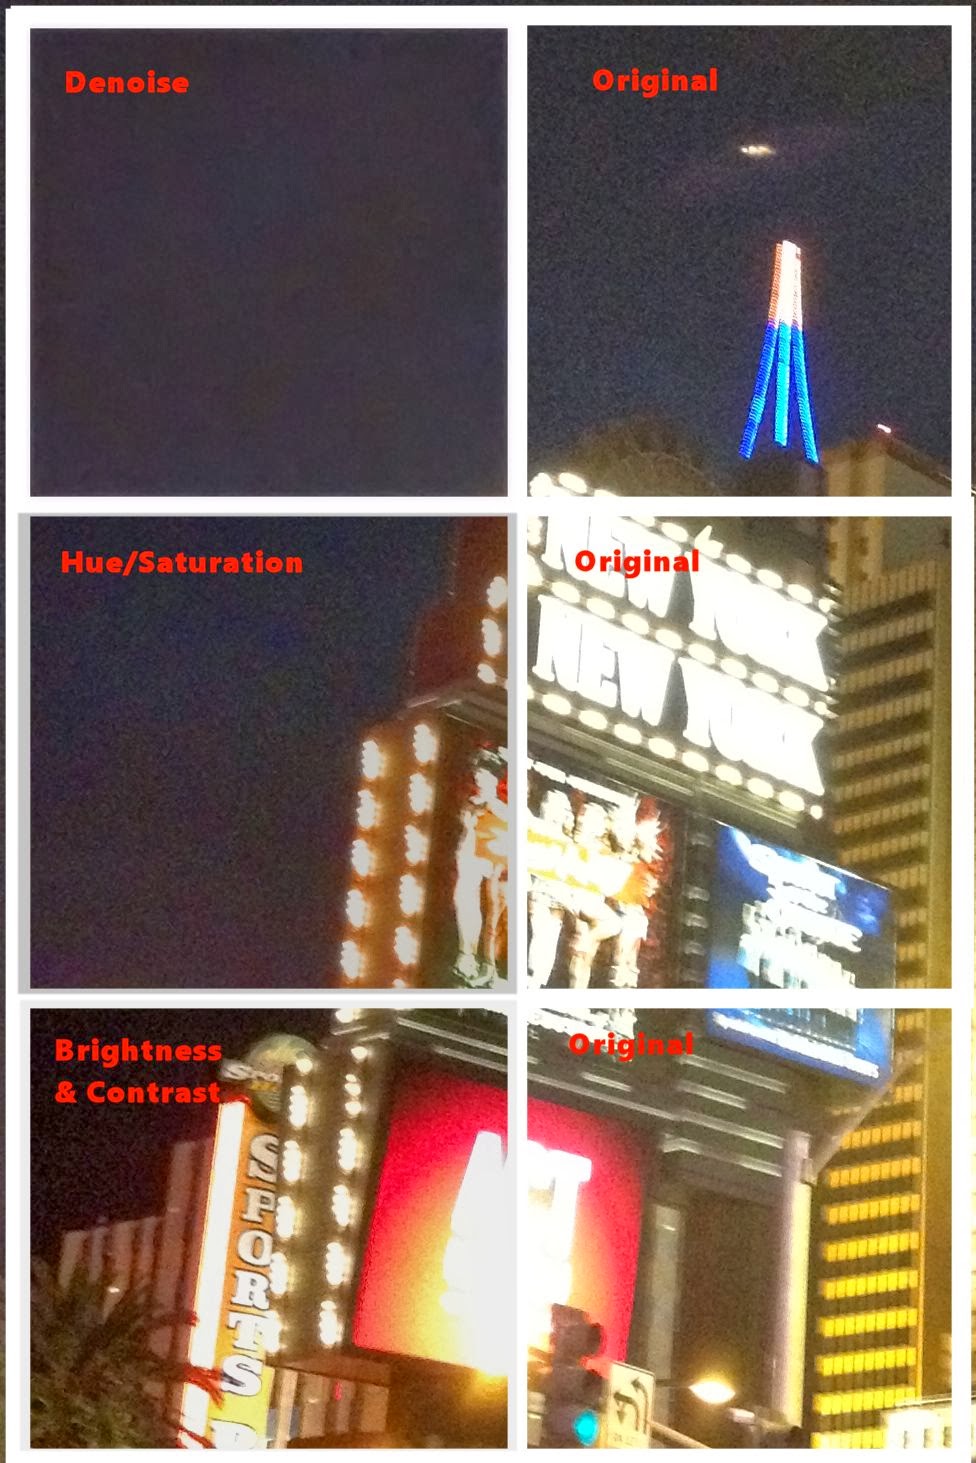 WHAT? In order to clean up these images, we Post Process them. This means taking the digital image and, using more math, remove the unwanted parts, and clean up or enhance the important information. We use terms like De-JPEG, Denoise, sharpen, and even brightness and contrast. Surprisingly enough, these terms are all self explanatory. De-JPEG is used to TRY to recover the lost information from the process of shrinking the file size. No matter how good the camera and set-up, we don't always get just the right light or get shadows that really detract from our work, Using brightness, contrast, and perhaps other available options, we can correct these issues and even enhance things that you may not have even seen.
HOW? Now that's the real question, isn't it. I could be myself and simply say play and practice, but that just wouldn't be right. So let's start by selecting software. If money is no object, by all means contact Adobe and purchase Photoshop, Lightroom, and/or any combination of packages they offer. They are the "industry standard" that everyone refers to. Add to that a couple of thousand hours for classes, practice, and watching YouTube how-to videos to be able to use it. You won't be sorry. If it can be done to an image, Adobe can do it! As an added bonus, many companies offer "Plug-ins" that can do miraculous things!
Working with a "no budget" budget? From the open-source projects there is the offering of "Gimp". This full featured package holds much of the power of Photoshop, but is FREE. The learning curve, however, is also quite similar. It is powerful, but not recommended for the beginner.
Somewhere in between are a whole host of other options. One that I personally use and recommend is Corel's Paintshop Pro. The Ultimate package sells for $99, and as recently as last weekend was on sale for $69 (currently $79), and $49 for an upgrade. This should be within striking distance of most photographers, and offers a 64-bit engine for faster work, and will accept most of the third party plug-ins made for Photoshop.
Once you have your software loaded, open a photo and start playing. First rule, as soon as you open the image, select the FILE menu, and then SAVE AS. Give your work in progress a unique new name and make sure you know what directory you are in! This will preserve your original image and all work will now be done on the new file. This will save a great deal of frustration and expletives as you WILL at some point make a mistake, and then save that mistake, erasing your original, and you will never forgive yourself! Okay, enough about my personal experiences.
Start simply, make minor adjustment at first. Use factory defaults to see how they work. Play, play, and then play some more. Check out tutorials and YouTube videos. Remember, most will be written about Photoshop, but the basics will transfer to most of the packages. Experiment with the order in which you make your adjustments. You will see that this has a huge impact on the finished product.
In the future, we will explore more about techniques, but for now, just start playing and see what you can do! I should note that while we do use Photoshop, all of the processing you see on this post was done with Paintshop Pro X-6 without any additional plug-ins.
Thanks for following my posts! Feel free to comment if you have any questions or thoughts that you would like to have me address.
WHY? Today's digital cameras have many options and settings. In years gone by, memory was extremely expensive. I remember being ecstatic when I was able to buy 1 megabyte of memory for only $100. But I digress. Photos can be saved in different formats (RAW, JPEG, BMP). JPEG is the most commonly used format . It utilizes complex math to shrink the size of the file. This allows photography to be something we could afford, allowing us to take more than 10-12 pictures on a memory card. Of course, there is always a trade-off. We lose quality when we compress these photos. Additionally, the sensors in our cameras rely on light to "excite" each pixel. In low light conditions, they strain very hard to gather every possible photon. This creates what we call digital noise, and can be compared to the graininess we used to see when shooting very fast film. Neither one of these conditions are acceptable if we wish to present our best shots for viewing.
HOW? Now that's the real question, isn't it. I could be myself and simply say play and practice, but that just wouldn't be right. So let's start by selecting software. If money is no object, by all means contact Adobe and purchase Photoshop, Lightroom, and/or any combination of packages they offer. They are the "industry standard" that everyone refers to. Add to that a couple of thousand hours for classes, practice, and watching YouTube how-to videos to be able to use it. You won't be sorry. If it can be done to an image, Adobe can do it! As an added bonus, many companies offer "Plug-ins" that can do miraculous things!
Working with a "no budget" budget? From the open-source projects there is the offering of "Gimp". This full featured package holds much of the power of Photoshop, but is FREE. The learning curve, however, is also quite similar. It is powerful, but not recommended for the beginner.
 |
| Post Processed, Signed - Silent Escort |
 |
| Saint Augustine, Florida Lighthouse 3 photos stitched together |
Start simply, make minor adjustment at first. Use factory defaults to see how they work. Play, play, and then play some more. Check out tutorials and YouTube videos. Remember, most will be written about Photoshop, but the basics will transfer to most of the packages. Experiment with the order in which you make your adjustments. You will see that this has a huge impact on the finished product.
In the future, we will explore more about techniques, but for now, just start playing and see what you can do! I should note that while we do use Photoshop, all of the processing you see on this post was done with Paintshop Pro X-6 without any additional plug-ins.
Thanks for following my posts! Feel free to comment if you have any questions or thoughts that you would like to have me address.


Comments
Post a Comment